How To Make Flower Front Door Decor Using Plastic Nursery Pots
INSIDE: How to upcycle plastic nursery flower pots into bright, colorful DIY flower front door decor. Spring summer flower door hanger.

If you were to come up my driveway, tucked in next to the garbage can, you would see two large stacks of those black plastic nursery flower pots. I practically had to wrap caution tape around these stacks to keep my husband from tossing them.
“I have plans for these”, I would tell him. He would give me the look, stare at me for a beat and then move on because he wasn’t going to win the discussion.
What I didn’t reveal is that I didn’t have an immediate stellar creative idea as I stared at these stacks. But once I got that creative brain burst (probably in the middle of the night and why I’ve now started using nightly eye cream), check out this very easy, very thrifty flowery front door decor idea…
HOW TO MAKE FLOWER FRONT DOOR DECOR USING PLASTIC NURSERY POTS
Why toss those utilitarian – alright, ugly – plastic pots that nursery flowers, vines and bushes come in? What is it that folks say — trash to treasure?!
Grab Your (Plastic) Potting Supplies:
– Variety of different sized plastic nursery flower pots, or whatever you have around
– Self-etching primer
– Exterior paints (spray paint for plastic or craft patio paints would suffice)
– Chicken wire
– Wire snips
– Floral wire
– Scissors + Craft glue
– Crayola Air Dry Clay, White, 5lb Bucket, Gift, Kids Indoor Activities At Home
HOW TO MAKE FUN AND COLORFUL FLOWER DOOR HANGER
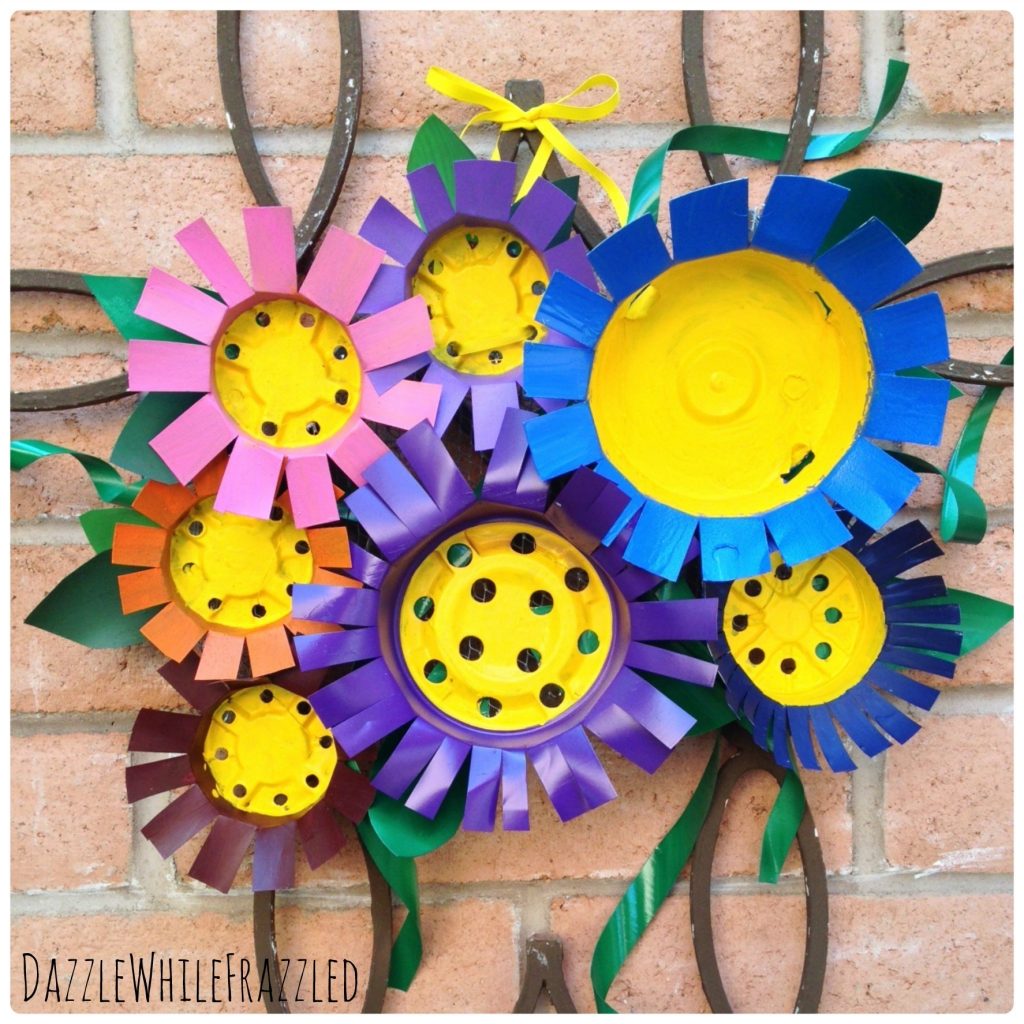
Step #1 – From Pot to Flower:
Assemble your [ugly] plastic pots. Using your scissors, cut a slit from top to bottom. About halfway down, begin to cut across the pot. You should end up with two pieces.
Take the bottom part of the pot and cut small, downward slits around the circumference. Fold down these slits to make a flower.
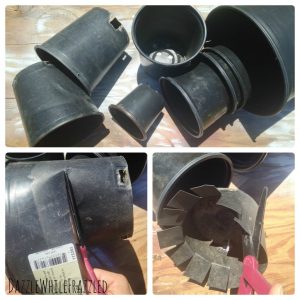
Cut leaf shapes from the remaining top part of the flower pot. I also cut long, rectangle-like strips from these sections. These strips will naturally curl but if you want more of a curlicue look, wrap the strips around a broom handle.
Step #2 – Clean and Paint:
With your pieces cut out, give them a water spray to remove any dirt. Let dry.
If using exterior or craft patio paints, cover them first with self-etching primer. (This will help the paint adhere to the plastic.) OR, use spray paints designed for adhering to plastic.
HOW TO RE-PURPOSE POTS FOR DIY FLOWER FRONT DOOR DECOR
Step #3 – Attach Leaves:
Once painted and dried, use craft glue to adhere the leaves to the backside of the flowers. Let dry.
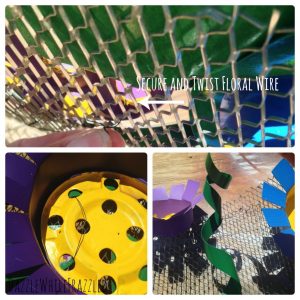
Step #4 – Layout and Secure:
Arrange your flowers in a layout you like best.
With an approximate measurement in hand, cut a section of chicken wire using wire snips. Begin securing the green strips and the flowers to the chicken wire with small pieces of floral wire.
If desired, you can paint the floral wire yellow to blend into the flower.
Step #5 – No Injuries:
Avoid unnecessary first aid treatment – fold down the ends of the chicken wire so you don’t scratch yourself or worse, scratch your front door!
Insert a ribbon and hang.